Watching a series with the family is cool, but don’t let that be your only bonding experience. These five awesome hobbies will make your bonds much stronger!

Illinois Valley House Cleaning Services | IV Clean Team, Inc.
Home cleaning, window cleaning, gutter cleaning, pressure washing service in Peru, LaSalle, Oglesby, Ottawa, Spring Valley, Utica, Mendota, Illinois
Watching a series with the family is cool, but don’t let that be your only bonding experience. These five awesome hobbies will make your bonds much stronger!

It’s easy to associate all fall decorations with the commercial gargantuan that is Halloween, but they don’t have to be the same. It doesn’t help that some autumn decorations can be a little kitsch, especially if they’re trying to be really eye-catching or to incorporate too many natural elements. Well, colors and the bounties of nature do have a place in our tips, but in a tasteful manner.
None of these decorations ideas are too complex, and all of them can be expanded upon as you see fit. Not only that, but you can also mix and match some of the elements to get the best results all around the house.
Velvet is an excellent option for autumn because of its soft texture and warmth. In keeping with the season, you can opt for an orange or brownish-yellow accent for your living room, such as throw pillows, blankets, ottomans, and even a full sofa upholstered in these colors.
Fall can be quite chilly, and blankets with interesting designs or tartan blankets draped over a dinner table can give your room a warm, inviting look to it. If you want to drive it even further, don’t forget to also change your table centerpieces so they also reflect the season.
Every season has a slew of floral arrangements to match it and autumn is definitely orange and white. You can try creating arrangements for your centerpiece or as an accent in your living room with large white flowers and orange small ones. Or, you can create arrangements where the colors are separated, with big blooming orange flowers in the center surrounded by smaller vases full of white ones.
If you want to add an extra layer to your floral arrangements, mix in some pheasant or similar feathers inside of the vase, some pine cones on the outside (you can paint them gold as well), and even some white decorative pumpkins. This works perfectly as a centerpiece for your dinner table or for the living room.
An entryway wreath is a fall tradition, but it doesn’t have to be bright orange or Halloween-themed at all. You can make an eye-catching wreath using dramatic elements such as shaggy vegetation, blackberries, fethers, and long blades of grass. This will make an untrimmed, thicker-looking wreath that will stun all visitors.
Here are a couple of fall decorations ideas for the outside. Instead of using a wreath, you can decorate your entryway by adding a dry cornstalk on both sides of the entrance door, giving you a more dramatic feeling every time you enter or leave the house. A nice way to compliment this decoration is with a couple of plain pumpkins near the entryway, adding more color and “life” to the arrangement while staying seasonal.
Adding some caramel-colored accents to your kitchen will give it a cozy feeling and extra warmth during the season. Not only is the color similar to the treats that are common during fall, but it might also inspire you to grab your utensils and make some dessert of your own!
Fall is widely known as the harvest season and few things reflect that style as good as wheat sheaves. You can make little bundles out of them and create an arrangement over your dinner or living room table. You can also use longer sheaves or sprays and decorate your entryway, adding them to your wreath for example.
Nothing says country-cozy like a big plaid blanket covering your bed! Get one in red, orange, and yellow hues to drop a warmth bomb over your whole room, and you can complement that feeling with a few plaid or tartan throw pillows. You can also use this to decorate the couch if you don’t want to decorate your bedroom.
Fall is a bountiful season, so why not display your delicious finds in an overfilled basket or bowl? Place it in your kitchen and try to include many different fruits or foods so the whole color palette of autumn is in full display. Apples, flowers, wheat, squash, small pumpkins, and flowers are all perfect for this.
There you have them! If you want to use any of these DIY fall decorating ideas, remember that you can riff on them any way you want to, like changing the colors a bit or using materials that are more easily available to you.
It’s time to get serious about relaxing. If you really want to go on a big vacation with the whole family, then it’s time that you all start saving money with our 4 wonderful tips.

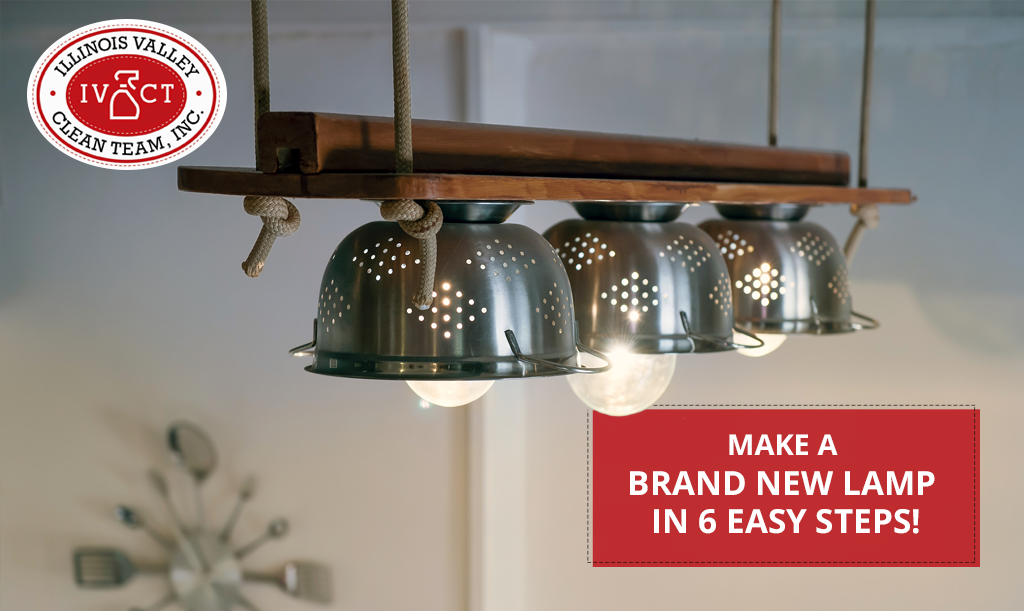
Few things in life give you the satisfaction that creating something from scratch does. There are many DIY house decoration projects out there, but when it comes to lamps or lightning, people feel intimidated by the idea. You should not! Working with wires or anything electrical does require you to be extra careful, but it’s also very safe when you know what precautions to take.
There are a few guides that will tell you how to make a lamp out of anything safely, and once you have that part down, you will not want to stop. Here are a few lamps and lightning easy craft ideas for the home so that you let your creativity run wild.
You can make a lamp out of almost anything! Almost being the operating word here, as there are a few requirements that an object needs to meet before qualifying as your next lamp. First of all, it has to be sturdy enough to stand on its own with the shade on top. Then, it has to be balanced so you don’t go knocking it around too easily, meaning top-heavy items are discouraged. It’s important to stabilize your base by filling it with sand, marbles, or even by affixing rubber stops to the bottom. Do this until there is zero wobble from it.
A lamp kit can be bought at most hardware stores and includes pretty much everything you need to make a lamp except the base. While you can buy them separately, getting them from a kit will make sure that they fit better together. In case you don’t want to (or can’t find) these things together, here’s what you will need: Detachable harp, #18 size cord, push-through socket with its shell, a finial, nuts, bolts, and washers.
You’re going to have to prepare the base for your wires to run through them. First, drill a hole wide enough for the cord to fit in and thread your cable all the way through and secure it on both sides. Next, secure the harp onto the base, running the cord through the small hall at the bottom. Now you have to screw the socket cap (where the lightbulb is going to be screwed on) onto the harp.
Your cord is made up of two insulated wires stuck together. Pull apart the two cables about 4 inches down from the top part, then remove 1 inch of insulating plastic from each separate wire using wire strippers (a knife is not recommended unless you’re very skilled using it). The next step is tying the wires so that they do not fall through the hole and into the base of the lamp. Use any know that you consider good enough, provided that it’s tight and wide enough so as not to slip through the hole.
First, find the hot wire and the neutral wire. Your cord has a couple of ways of telling you which is which; the neutral wire is usually ribbed or white, and the hot wire is smooth or black. If you have doubts, refer to your lamp kit’s instructions. Take the previously stripped wires and wrap them clockwise around the bulb socket: The neutral wire goes on the silver/white screw, while the hot wire goes on the gold/black/dark screw. Again, check the manual if you’re unsure. You can tighten the screws with a screwdriver once they’re wrapped.
It’s all smooth sailing from here. After you wrap the wires around the screws, put the socket shell over the bulb socket and tuck the cords so they’re not sticking out and let the shell fall smoothly into place. Attach the top of the harp to the bottom part and squeeze the sides a little while you slide them into place. Place your shade on top and secure it with a lock nut. Now, all you have to do is screw a lightbulb into place and you have yourself a new lamp!
As you can see, there are many easy craft ideas for homes, but almost none are easier than making a lamp of your own. From the classy to the outright nerdy, we hope that this guide helps you expand your skills and have lots of fun while doing so. And if you don’t think there’s not enough time with all your other chores, we can help you with those!
Are you tired of doing a million little things to save money every month to no avail? Our 5 tips on saving money with the big picture stuff will help your finances get back on their feet.